


The other great thing about this block is its size. This is a 15 inch block! So, a 4x4 block quilt would make a generous throw size, and a 3x3 block quilt would be perfect as a baby quilt. Bigger blocks = less teeny tiny pieces, and I'm all about that! If you would rather a smaller block, here are the measurements for that as well-

To make a purse strings block, cut four 5.5 inch squares to make the "purse flaps," four 5.5 inch squares to make the "strings," and one 5.5 inch square for the center of the block, or the "inside of the purse." This center square would be a great place to use fussy cuts! You will also need sixteen 3.5 inch squares of your background fabric (or, corner squares).
I am using only three fabrics (plus white), but this would also be really cute as a scrappy block!

First, we'll make the four "purse flaps." These surround the center square, so if you have a stripe, chevron, or other design that would look cute in a radiating pattern, go for it!
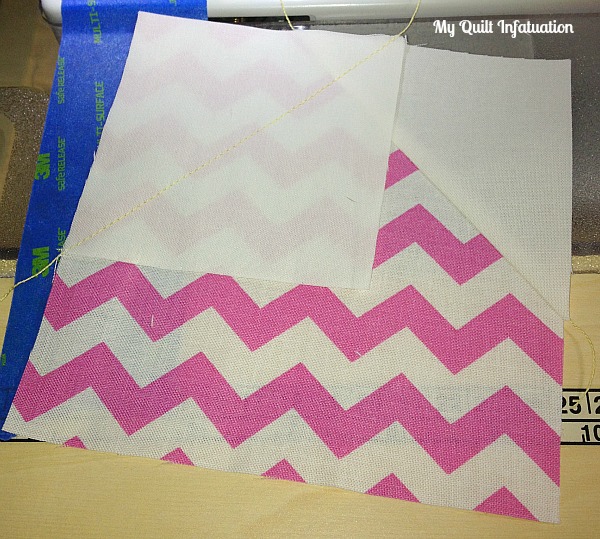
To make these pieces, we need to line up one white square on the corner of your printed fabric and sew corner to corner. Like this-

To keep your stitch line straight, many people recommend drawing a diagonal line across the back of your square as a guide. I really hate this step, so as a little trick, I use a piece of painter's tape aligned with my needle on my machine and table.

You can keep the corners in line with the edge of the tape, and know that you're sewing a straight line! After sewing, take your scissors and trim away the excess, leaving 1/4 inch seam allowance. It doesn't have to be too perfect!

Give it a quick press, then line up another white square with an adjoining corner. Sew corner to corner in exactly the same way!
Trim away the excess, and press again!

Repeat these steps for all four "purse flap" pieces. I promise, once you get the hang of it, it goes really quickly, and the end result is worth it!

The points on these don't go all the way to the edge of the block (unlike flying geese), and that's by design. When the blocks are all put together, it creates a great shape in the negative space!
Now, we'll use the same technique to create the "drawstring" parts of the block, better known as a Road to Tennessee block. These are a little bit quicker because you won't have to press until the end. Start by lining up a white square on top of your printed fabric and again, sewing corner to corner and trimming the excess. Don't worry about pressing this just yet!
This time, our second white square will be sewn to the opposite corner, rather than an adjoining corner. Sew the second piece and trim. Your piece should look like this.

Now we're ready to press! Be careful not to drag the iron too much or you'll distort your corners!

Repeat for all four "drawstring" pieces!

After all of that, the rest is really a snap! Lay out your blocks like this- Do you see the purse and strings shape?

Sew them together as you would a plain old nine patch. Give your block a final press, and voila! A beautiful Purse Strings block!

Of course, the real beauty of these blocks happens when they're all put together! Lots of quilt blocks are like that. I love the little figure-eight shape created between these. I can see lots of opportunities for some creative quilting in these little negative spaces!

Edited 9/21- Here is what the blocks look like all together in the finished quilt! You can find additional pictures of the finished quilt HERE!


Love it!! Great job. Pinned!
ReplyDeleteGreat block Kelly. Love the impact and the changing pattern when they are all together. Fabulous tutorial. Thanks for sharing. Marie
ReplyDeleteLove!! And thanks for sharing!
ReplyDeleteThat long piece of tape is genius! I hate drawing those lines, so I'll have to try it.
ReplyDeleteAnd I love the white joined squares that these blocks make when you put them together. I bet they'd look awesome if you set them on point. I'll have to add this to my list of blocks to try!
Oh how I love painters tape! Excellent block. :)
ReplyDeleteSuch a great block Kelly! I love that it's so big and comes together quickly. Great job.
ReplyDeleteBeautiful! Thank you!!!
ReplyDeleteThis looks so easy even I could do it. Thanks for sharing!
ReplyDeleteVery nice Kelly! Congratulations on what looks to be a new block design! Woohoo !
ReplyDeleteThis is such a great block!
ReplyDeleteThat is one sweet block you came up with! They look great together and I love that negative space. Pink and orange are a great combination - nice choice! Great tutorial, Kelly! Hope you don't mind if I share this, with a link back, on my facebook page at http://facebook.com/sewfreshquilts
ReplyDeleteKelly, your "purse strings" block looks lovely. I'm glad to see you did'nt change your first sketch. It turns perfectly and is so a new one.
ReplyDeleteThank you for such a good idea !
This looks great! I might have to try this one out.
ReplyDeleteAdorable! What a great block!
ReplyDeleteFantastic job Kelly! I love the negative space it creates!
ReplyDeleteSuch a great block!!
ReplyDeleteI love this and I'm marking it on my to-do! Great job!
ReplyDeleteI LOVE THIS!!!!!!! thank you sooooooooooo much for sharing.
ReplyDeleteSo beautiful! Thank you for sharing the love...I just need more hours in the day to do all the projects I want to explore but this one just ran to the top of the list!
ReplyDeleteI've drooled over this block for a while now and I'm so excited to dive in. I'm making a Purse Strings quilt with the Bijoux line as a wedding gift... I think it's the perfect block to show off the gorgeous fabrics in a modern, unique, and romantic way. So, thanks VERY much for sharing your design and your wonderful tutorial. :)
ReplyDeleteI've been waiting until I finished this and gave it to my friend before posting. I made this queen sized using the medium sized blocks for a friend (why didn't I do the larger?!?) http://sparky.tasgeocaching.com/secret-quilt/
ReplyDeleteGorgeous block and quilt! Great tute, goiong to give it a try on the weekend, thanks! :)
ReplyDeletegoing to do the purse strings block for a customer cannot wait to get started.
ReplyDeletePerfect. Quick and easy is just my style. ;)
ReplyDeletees hermoso, pero alguien me puede pasar las medidas de cada tela? gracias!
ReplyDeleteI like your purse strings pattern. easy to hand quilt.
ReplyDeleteRose clerkathome@q.com
I just love this block. I whipped one up in no time for project Linus. It turned out so cute. I couldn't find the book I made this from years ago,then I ran across yours on Pinterest. So I had to make it again! Thank you!
ReplyDeleteI just love this block. I whipped one up in no time for project Linus. It turned out so cute. I couldn't find the book I made this from years ago,then I ran across yours on Pinterest. So I had to make it again! Thank you!
ReplyDeleteI love your quilt. You did a wonderful job matching the colors.
ReplyDeleteThe block is great.
I've been scrounging my Pinterest saves for a block pattern for a vintage sheets block swap I'm part of (#vsqltblkswap on Instagram). Ding!Dinf!Ding! I've found a winner! Thank you for sharing this fab block and tutorial to the world.
ReplyDeletethis is such a super design - i am making a quilt this winter and am now so inspired. i was going to just do a Road to Tennessee block but this is an upgrade on that! by the way does anyone know the origin of the Road to Tennessee block ? is there a story. i was due to visit TN this summer but had to postpone it. so im making a quilt instead!
ReplyDeleteHi Kelly, you should be proud, this is an absolutely gorgeous quilt! Thank you for the tutorial, I will definitely be making one. Could you please share the fabric requirements? Also I would love to sign up for emails. Do you do that?
ReplyDeleteHi Kelly didn't see the "Notify me" button in time.
ReplyDelete