


This tutorial was originally included in Fort Worth Fabric Studio's Christmas in July series, but I wanted to go ahead and make sure it was available here as well to keep it easily searchable. This table topper has big blocks that pack the punch of a vibrant Poinsettia bloom, and they're perfect for showing off your favorite holiday fabrics. I made mine with Kate Spain's Jingle collection and I love it!

I absolutely love Kate Spain fabric, and this line is no exception. The colors and prints are classic, but they feel very fresh and modern. They're clearly Christmas prints without being overly kitschy.

For this project you will need four different prints, plus backing and binding fabric. I love fabric variety, so I used two different prints from the collection for a total of six prints.
To make this Poinsettia Table Topper, you will need-
1/8 yard- Jingle Birds and Berries Snow (centers of flowers)
1/2 yard- Jingle Noel Crimson (primary petals)
1/2 yard- Jingle Winter Wishes (secondary petals)
1/3 yard- Jingle Holly Cedar (leaves)
1/2 yard- background fabric (I used Kona White)
1 yard- Jingle Holly Multi (backing)
1/3 yard- Jingle Incline Multi (binding)Cutting your fabric-
Centers of flowers-
from 1/8 yd. Jingle Birds and Berries Snow, cut
(4) 4.5 inch squares
Primary petals-
from 1/2 yard Jingle Noel Crimson, cut
(16) 4.5 x 6.5 inch pieces
Secondary petals-
from 1/2 yard Jingle Winter Wishes, cut
(16) 2.5 x 4.5 inch pieces
(16) 2.5 x 6.5 inch pieces
Leaves-
from 1/3 yard Jingle Holly Cedar, cut
(16) 4.5 inch squares
(48) 1.5 inch squares
Background-
from 3/8 yard background fabric, cut
(64) 2.5 inch squares
(32) 1.5 inch squares
(2) 1.5 x 16.5 inch sashing strips
(1) 1.5 x 33.5 inch sashing strip
Okay! Let's make the blocks! This project is made from four blocks, and although it seems like a lot of pieces, they go together pretty quickly- I promise!
Each block requires-
(1) 4.5 inch center square
(4) 4.5 x 6.5 inch primary petals
(4) 2.5 x 4.5 inch secondary petals
(4) 2.5 x 6.5 inch secondary petals
(4) 4.5 inch leaves
(8) 1.5 inch leaf squares
(16) 2.5 inch background squares
(12) 1.5 inch background squares

This block requires corner to corner sewing (or snowballing), which can be done with a few different methods. Some people like to draw a line on the back of each square, and some prefer to use a piece of painter's tape on your sewing machine and table to use as a guide. Personally, I like to throw caution to the wind and just eyeball it. Since these pieces are small, they are easy to keep aligned.
Now, I think it goes faster to piece this block in stages, working on one part for the whole block instead of running back and forth to my ironing board fifty times. So, start by sewing four of the small leaf print squares to each corner of the center square. This center square is a great place for fussy cuts, but I didn't take it that far. I did, however, make sure that each center square had a little cardinal in it somewhere.

Then, sew two 1.5 inch white squares on one end, and two 1.5 inch leaf print squares to the other end of the primary petals as shown. Go ahead and make all four of these!

Divide the secondary petals in half. Each set should have (4) 2.5 x 4.5 inch pieces, and (4) 2.5 x 6.5 inch pieces. You'll see why this is important in the next step. Take one set of secondary petals and sew 2.5 inch squares to the narrow sides as shown by the arrow.

Okay, take special note of this next part because it's important- With the second set, sew 2.5 inch squares in the other direction. I added arrows to my pictures to make sure this is very clear.

The final bit of corner to corner sewing is the leaves. Sew the last two 2.5 inch squares to opposite sides of the leaf print. You'll need to make four of these.

Now for the trimming. This part is easy peasy! Just trim the excess fabric 1/4 inch from each seam. like this-


I know it seems like a ton of those little corners, but they go quickly when you get into it. You can see how much slower it would be if you took each piece to the ironing board separately though, right? Now that they are all sewn and trimmed though, one trip to the iron is all you need. Give those corners a press.

Time to create the corner units! This includes the leaves and secondary petals. Sew two corner units like this-

and the other two like this-

This is why sewing the secondary petals in opposite directions was so important earlier. This allows you to create two of the corner units and the other two with a mirror image. I think keeping the longer dark red pieces aligned makes the finished block look more polished.
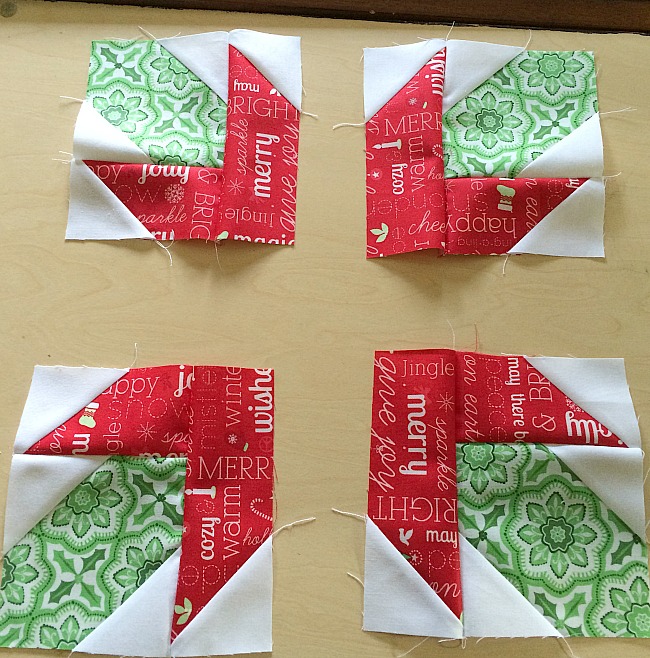
Once you're at this stage, the rest is a breeze! Just lay out your block, and sew it together like a nine patch block!

Voila! A beautiful poinsettia block, measuring 16.5 inches (16 inches finished). Trim to 16.5 inches if needed.

Once you have all four of your blocks put together, join them together in pairs, using the short sashing strips.

And join the pairs together using the long sashing strip. After that, just quilt and bind as desired, and enjoy! This little quilt finishes at 33 inches, so it's a perfect size for a table centerpiece, or even to hang on the wall. I love the shape created by the negative space between the blocks. It's almost like a snowflake!

Since I made this back in July, it felt brand new again when I pulled it out to decorate for Christmas. It is on the table in my breakfast area, and it just makes me smile!

Thank you so much ~ I love this!!!
ReplyDeleteWhat a great design that would work in so many different fabric styles. I agree with you on Kate's fabrics, clear colors and crisp print designs. Thanks for sharing the tutorial!
ReplyDeleteThis is gorgeous! Thanks for sharing the tutorial <3
ReplyDeleteThank you for the tutorial, a very pretty table topper.
ReplyDeleteAbsolutely stunning! Thanks for sharing the tutorial...but you're right the count down is dwindling too fast!!!
ReplyDeleteNicely done tutorial, and those colors look like you!
ReplyDeleteI love this.. I would like to make this into a twin size.. What dimensions do you think that might be? how many blocks X how many blocks?
ReplyDeleteThank you for the tutorial. I made one block today and made it into a table centre. It turned out really nicely. It is in the mailbox to be sent to brightens someones day.
ReplyDeletelovely - great tutorial, good photos!
ReplyDeleteBeautifully done! Thank you for sharing
ReplyDeleteSo pretty Kelly, I do wish I had purchased some of these fabrics!
ReplyDeleteMerry Christmas!
Great project. It will be on my to-do list. Thanks and Merry Christmas.
ReplyDeleteeste trabajo es precioso
ReplyDeleteI haven't made it yet but it it beautiful. I want one for Christmas and 4 the if July. I live the pattern.
ReplyDelete