


When you hear quilters talk of a "design wall," they are talking of a plain, white wall with flannel on it, where quilt blocks can be stuck and moved around easily to play around with quilt design. Now, I don't have a design wall, but I do have a place that serves the same purpose. And it's a place where quilts feel right at home- a bed!
An upright design wall is really cool, but I just don't want one up all the time. My solution is a flat white sheet spread out on my guest bed. It's quick, cheap, and easy to put away. So, take your blocks somewhere they can be arranged, whether it's a bed or an open space on the floor. Whatever works!
Lay out your bricks, beginning with six bricks on the top row, followed by a row that begins and ends with half bricks. These rows will have five full bricks between the halves. Continue this pattern until you have 15 rows of bricks.

Play around with your bricks until you like your fabric placement, and then, and this is important- take a picture. Look at the picture to see if you have any obvious light or dark spots in your brick layout. Sometimes a camera picks up what our eyes can miss! Save the picture- and I promise, you'll thank me later.
So, you've spent all that time making sure that your fabrics are in the exact place you want them, right? Wouldn't it be a shame to waste all of that work by sewing them together out of order? The way we're going to prevent this is by picking them up a certain way.
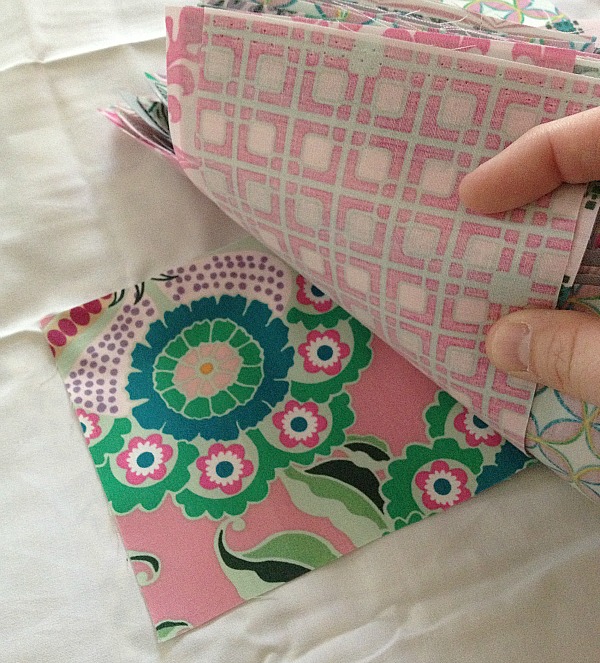
Look at the picture above. See the striped fabric in the upper left hand corner? That brick will be on top of the whole pile when we're finished. And the pink brick with the large green floral in the bottom right corner? It'll be on the very bottom. Think of it like a page in a book. We're going to move from top to bottom, left to right.
Pick up each row, keeping them in order from left to right. When you get to the last brick in the row, leave the stack there. This is what you'll have when you stack each row-

You may choose to use sticky notes to number each stack, or even paperclip them together. I usually just stack mine like this, from top to bottom. See the striped fabric? There it is on top!

and the pink floral brick on the bottom!
Okay, time to take those stacks to the sewing machine! Remember in our Tools and Fabrics post how I mentioned that a quarter inch foot would be helpful? Well, if you've got it, put it on your machine! Make sure your needle is in the correct position for the foot, as some machines require a needle adjustment for this foot. If you don't, I'll show you how to sew a perfect quarter inch seam anyway!
Here's mine- see how the edge of the foot is perfectly lined up with the 1/4 inch mark? I can keep my fabric aligned with the edge of my foot, and maintain an accurate seam.

If you don't have this foot, just pull out your painter's tape, find the 1/4 inch mark on your stitch plate, and make your own guide!

We're ready to sew! Take your first stack and set the others aside. Take the first two bricks and sew them with right (or, correct) sides together. Open them up, and add your next one. Keep adding bricks from your stack until you have this-

We're not going to worry about pressing just yet, but we ARE going to worry about laying this row somewhere we will remember which side is the left. I usually drape mine over a chair or the dining room table- always left to right. Lather, rinse, repeat until you have your first five rows. We're only working with five at a time, because that will keep all of this left to right business easier to handle.

We're getting good! Now it's time to join our rows. Take the second row and flip it on top of the first and sew them together on the side where you flipped.
When you are joining your rows, try to be mindful of the two ends and make sure you don't get one row that is shorter than the other. Even though our rows started out the same size, if you allow your fabric to "walk" on you, you'll end up with one row that is too short. If that does happen, don't stress out. We can trim up our edge later!

Then add another row-

Keep on going until you have all five sewn. We're one-third of the way finished with the top! Lay this part over a chair or somewhere (and remember which side is the left!). If at any point you happen to forget which side is left, just pull out your handy-dandy picture and take a peek (I told you you'd thank me later)!

Repeat the same process for the next two sets of five rows.

Alright y'all, we're on the home stretch! Think of these chunks like really thick rows (because that's what they are), and flip the middle chunk over on the top one. Sew the top two together. You have to be careful here, because this has a bit more weight than the skinny rows, and the fabrics will "walk" on you if you're not careful! So, just take your time.

Add your third chunk! You've just finished piecing your quilt top!
Now all you have to do is press it! Remember, use starch, and let the weight of the (really hot) iron do the work. Don't rub back and forth on your seams or pull on the edges of quilt top with your iron. That will cause big trouble later. We are pressing, not ironing. I never knew there was a difference until I became a quilter, and believe me- there is.
Once the last seam is pressed, step back and take a look at your accomplishment! Ta-da!

Awesome! Smile big- you know you're proud of yourself! Now, for next week, remember that you'll need 3.5 yards of backing fabric, and 3/4 yard of binding fabric (the edge). Keep in mind that this will give us some fabric left over (not a whole lot), but I want to construct the backing with the fewest number of seams possible to make it easier for everything to lay nice and flat.
Hang onto those extra bricks and fabric scraps! We'll be using those too!

The quilt is gorgeous, and your directions are stellar! I love,love,love this quilt. Thanks so much for explaining the sequences! I want to make this..also the way the colors look together is quite beautiful. Thank you sooooo much!
ReplyDeleteJackie
Thank you Jackie! I'm glad you like the quilt and the post. I worked hard to be sure that a beginner could follow these directions! I hope you will join us!
Delete:) Kelly
ps- you're a no-reply blogger, so I'm answering you here!
Great Article Kelly!
ReplyDeleteI just released ‘Quilter’, an iOS app to help layout/design/ and calculate yard requirements for quilts. Check it out if you will and give me some feedback!
https://www.facebook.com/Quiltler/
Great Article Kelly!
ReplyDeleteI just released ‘Quilter’, an iOS app to help layout/design/ and calculate yard requirements for quilts. Check it out if you will and give me some feedback!
https://www.facebook.com/Quiltler/
I am going to make a QOV with these great instructions and use up lots of my scraps. Thank you.
ReplyDeleteWhat size are you brick and half bricks?
ReplyDelete