



Page Buttons

Wednesday, December 16, 2015

Filigree Finished and NTT

I refuse to accept the fact that Christmas is a short nine days away.  The last few weeks have flown by at lightning speed and I'm still working on one final Christmas order.  I am super excited that I get to share another finish with you today, though.


This quilt is for my grandmother and measures 74" x 74."  She wanted a quilt that was between a thrown and twin size, and although I planned to make a quilt that was around 65-70" square, the pattern dictated the larger size.  Speaking of the pattern, that is on my list to finish up within the next couple of weeks.  Here's a sneak peek at the cover though-


I really loved designing this pattern, but in retrospect, I wish there was a little bit more contrast between the two shades of blue, so the twisted ring pattern would show up better.  Oh well, hindsight is 20/20, I guess.  My grandmother loves it, and that's the most important thing for sure.


I used all of my scraps on the backing, and because I used several more prints than necessary, the leftovers turned out to be substantial!


I had enough leftover fabric to make a scrappy binding, but I thought since both the front and back were a little busy, this quilt needed a solid binding. Kona Navy fit the bill perfectly!  My grandmother also asked for a matching throw pillow, and I had just enough strips to make this fun spiral improv pillow.


I don't know why, but I find this method to be much more tedious than my usual improv method, which works in a rectangular shape.  With this spiral/circular improv, I feel like I end up having to cut too much fabric away.  Maybe I'm just going about it the wrong way?  I do love how the pillow turned out though, even though it was a pain to put together.  It is a 16 inch pillow, and I still need to get the pillow form for it.  Then, I'll be ready to give both to my grandmother when I see her for Christmas.  I can't wait for her to see them in person!

By the looks of last week's party, y'all are sewing up a storm too!  Linda at Koka Quilts showed off this amazing quilt, full of so many gorgeous fabrics.


Jessie at Measuring Success linked up this Radiant Blues quilt.  Just beautiful colors.


and Helen from Till We Quilt Again shared her stunning Eclipse quilt.  This illusion is jaw-dropping!


Wow...just WOW!  Believe me when I say that I really wanted to choose several more from last week's awesome party, but as I type this post, it is almost time for my wild thing to get home from school.  I know you're all busy finishing up those gifts for special people, and checking off the to-do list as Christmas creeps ever closer.  I can't wait to see what you're sewing this week!

**By the way- since next Thursday is Christmas Eve, NTT will be taking a break.  We will resume the following week (I know that's New Year's Eve, but we're going to party anyway that week).  I hope you all have a fantastic holiday!

1.  You can link finished projects or WIP's , but just keep it about quilting and sewing!
2. Link to your specific post (not to your home page!) to make it easier for others.
3. Please remember to spread the word and post my button or a text link.  
4. Spread the comment love far and wide!
5. Following me is not a requirement to link, but is so very appreciated!


Sunday, December 13, 2015

Poinsettia Table Topper

Hey friends!  'Tis the season for all things holiday inspired, because the days until Christmas are dwindling fast.  I'm squeezing in all of my fun holiday projects while I can!  If you missed it, I posted this ornament quilt tutorial and giveaway on Thursday, and today I am re-sharing this Poinsettia Table Topper.

This tutorial was originally included in Fort Worth Fabric Studio's Christmas in July series, but I wanted to go ahead and make sure it was available here as well to keep it easily searchable.  This table topper has big blocks that pack the punch of a vibrant Poinsettia bloom, and they're perfect for showing off your favorite holiday fabrics.  I made mine with Kate Spain's Jingle collection and I love it!


I absolutely love Kate Spain fabric, and this line is no exception.  The colors and prints are classic, but they feel very fresh and modern.  They're clearly Christmas prints without being overly kitschy.


For this project you will need four different prints, plus backing and binding fabric.  I love fabric variety, so I used two different prints from the collection for a total of six prints.

To make this Poinsettia Table Topper, you will need-

1/8 yard- Jingle Birds and Berries Snow (centers of flowers)
1/2 yard- Jingle Noel Crimson (primary petals)
1/2 yard- Jingle Winter Wishes (secondary petals)
1/3 yard- Jingle Holly Cedar (leaves)
1/2 yard- background fabric (I used Kona White)
1 yard- Jingle Holly Multi (backing)
1/3 yard- Jingle Incline Multi (binding)

Cutting your fabric-

Centers of flowers-
from 1/8 yd. Jingle Birds and Berries Snow, cut 
(4) 4.5 inch squares

Primary petals-
from 1/2 yard Jingle Noel Crimson, cut 
(16) 4.5 x 6.5 inch pieces

Secondary petals- 
from 1/2 yard Jingle Winter Wishes, cut 
(16) 2.5 x 4.5 inch pieces
(16) 2.5 x 6.5 inch pieces

Leaves-
from 1/3 yard Jingle Holly Cedar, cut 
(16) 4.5 inch squares 
(48) 1.5 inch squares

Background-
from 3/8 yard background fabric, cut
(64) 2.5 inch squares
(32) 1.5 inch squares
(2) 1.5 x 16.5 inch sashing strips
(1) 1.5 x 33.5 inch sashing strip

Okay!  Let's make the blocks!  This project is made from four blocks, and although it seems like a lot of pieces, they go together pretty quickly- I promise!

Each block requires-
(1) 4.5 inch center square
(4) 4.5 x 6.5 inch primary petals
(4) 2.5 x 4.5 inch secondary petals
(4) 2.5 x 6.5 inch secondary petals
(4) 4.5 inch leaves
(8) 1.5 inch leaf squares
(16) 2.5 inch background squares
(12) 1.5 inch background squares


This block requires corner to corner sewing (or snowballing), which can be done with a few different methods.  Some people like to draw a line on the back of each square, and some prefer to use a piece of painter's tape on your sewing machine and table to use as a guide.  Personally, I like to throw caution to the wind and just eyeball it.  Since these pieces are small, they are easy to keep aligned.

Now, I think it goes faster to piece this block in stages, working on one part for the whole block instead of running back and forth to my ironing board fifty times.  So, start by sewing four of the small leaf print squares to each corner of the center square.  This center square is a great place for fussy cuts, but I didn't take it that far.  I did, however, make sure that each center square had a little cardinal in it somewhere.


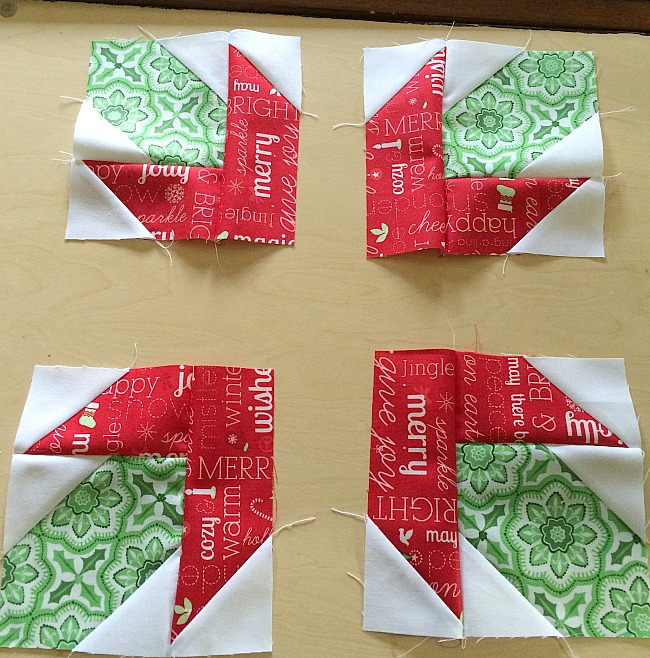
Then, sew two 1.5 inch white squares on one end, and two 1.5 inch leaf print squares to the other end of the primary petals as shown.  Go ahead and make all four of these!


Divide the secondary petals in half.  Each set should have (4) 2.5 x 4.5 inch pieces, and (4) 2.5 x 6.5 inch pieces.  You'll see why this is important in the next step.  Take one set of secondary petals and sew 2.5 inch squares to the narrow sides as shown by the arrow.


Okay, take special note of this next part because it's important- With the second set, sew 2.5 inch squares in the other direction.  I added arrows to my pictures to make sure this is very clear.


The final bit of corner to corner sewing is the leaves.  Sew the last two 2.5 inch squares to opposite sides of the leaf print.  You'll need to make four of these.


Now for the trimming.  This part is easy peasy!  Just trim the excess fabric 1/4 inch from each seam.  like this-


I know it seems like a ton of those little corners, but they go quickly when you get into it.  You can see how much slower it would be if you took each piece to the ironing board separately though, right? Now that they are all sewn and trimmed though, one trip to the iron is all you need.  Give those corners a press.  


Time to create the corner units!  This includes the leaves and secondary petals.  Sew two corner units like this-


and the other two like this-


This is why sewing the secondary petals in opposite directions was so important earlier.  This allows you to create two of the corner units and the other two with a mirror image.  I think keeping the longer dark red pieces aligned makes the finished block look more polished.


Once you're at this stage, the rest is a breeze!  Just lay out your block, and sew it together like a nine patch block!


Voila! A beautiful poinsettia block, measuring 16.5 inches (16 inches finished).  Trim to 16.5 inches if needed.


Once you have all four of your blocks put together, join them together in pairs, using the short sashing strips.


And join the pairs together using the long sashing strip.  After that, just quilt and bind as desired, and enjoy!  This little quilt finishes at 33 inches, so it's a perfect size for a table centerpiece, or even to hang on the wall.  I love the shape created by the negative space between the blocks.  It's almost like a snowflake!


Since I made this back in July, it felt brand new again when I pulled it out to decorate for Christmas.  It is on the table in my breakfast area, and it just makes me smile!


Thursday, December 10, 2015

Christmas Adorned Tutorial and Giveaway

**If you're looking for NTT, it is happening now, right HERE.  But before you go check out the party (and another new quilt top I shared), take a look at this fun Christmas quilt tutorial and enter the giveaway below!

After several days of keeping it secret (and I'm terrible at that), I am so glad I finally get to share this fun Christmas ornament quilt with you!  The quilt is made with the Santa's Here line from Benartex, and it was so much fun to create!


I wanted to create a quilts that would show off several of the prints in this line, and I wanted the quilt to be a little bit whimsical.  If you can't have a bit of whimsy at Christmas, then when can you have it?


I love the rich colors in this collection, as well as the fact that the prints have traditional motifs without looking cartoonish.  I included so many more prints than necessary on the front of this quilt, which gave me lots of leftovers for the backing, and even a scrappy binding!


I couldn't resist taking the photos of this one under my Christmas tree.  It can't possibly serve it's quilty purpose rolled up under the tree of course, but doesn't it look right at home?


I have created a full tutorial for this quilt, including fabric requirements and cutting diagrams (and it's pretty quick to put together!), so head on over to the Benartex blog, Sew in Love With Fabric to check it out!

The kind folks at Benartex are giving away a fat quarter bundle of the beautiful Santa's Here fabric collection.  To enter the giveaway, become a follower of Sew in Love With Fabric by email or blog reader.  You can find the buttons for those on their right sidebar.  Then, just leave a comment for me here to let me know how you're following.  If you are a follower of My Quilt Infatuation as well, you get a second entry!  For your second entry, leave a second comment with your favorite Christmas song (only two entries per person, please).  The giveaway will close one week from today, on 12/17.  Best of luck to all!

This giveaway has now ended.  Thanks so much to all who entered, and Merry Christmas!


Wednesday, December 9, 2015

NTT and a New Quilt Top

Happy Needle and Thread Thursday, friends.  First of all, I want to apologize for the hassle with the link last week.  Unfortunately, the issue was with the Linky Tools service, and my hands were tied.  I'm glad that it got fixed with a little bit of time left in the party.  Thanks so much for your patience, and a special thanks to those who were able to check back and link up after it was fixed.

I've been sewing a few Christmas odds and ends, including this Evergreen Patchwork pillow, as well as a fun quilt made with the bundle I showed last week.  I can't reveal it just yet, but be on the lookout tomorrow morning for the tutorial and a great giveaway.  I've also been working on a new quilt and pattern, and I just finished the top this afternoon!


I haven't completely decided on the name for this pattern, but I was thinking about calling it Filigree. The cross shape, as well as the twisted look of the dark and light within the quilt reminds me of metal work in jewelry.  This quilt is for my grandmother, who is redecorating a bedroom in her house.  I will see her at Christmas, so my plan is to get it finished so I can give it to her then.

Even though last week's party was almost derailed, it still wasn't a bust.  Though the links were few, they were magnificent!  Sew Preeti Quilts shared this happy, colorful Birch Trees quilt.


Teje at Nero's Post and Patch showed her progress on this beautiful wintry quilt.


And my, oh my!  This Shimmer quilt from Lorinda at Laurel and Pine is fabulous!


If you think that with about half of the usual links, I had an easier time choosing quilts to feature...you would be incorrect!  Y'all are just that awesome!

By the way, I hope that those of you who didn't get a chance to link last week will feel free to link more than one project to this week's party so we don't miss a thing.  Let's get down to it!

1.  You can link finished projects or WIP's , but just keep it about quilting and sewing!
2. Link to your specific post (not to your home page!) to make it easier for others.
3. Please remember to spread the word and post my button or a text link.  
4. Spread the comment love far and wide!
5. Following me is not a requirement to link, but is so very appreciated!

*Don't forget to stop by tomorrow morning to check out my new Christmas quilt tutorial and enter the giveaway!


Monday, December 7, 2015

Evergreen Patchwork

It's beginning to look a LOT like Christmas around here!  Sometimes when I'm in the middle of a big project and it starts feeling tedious, sewing something small refreshes me, and then I can jump back in with enthusiasm.  So, that's just what I did.  I have been sewing up a storm on a few Christmas gifts that need to be kept secret, but this pillow was a perfect little diversion.


I had a single mini charm pack of Evergreen by Basic Grey, and it was almost enough to make this 12" x 16" pillow.  I had to add six additional squares (for 48 total) from my Christmas scraps, but I think the additions blend well with the collection.


The back is a rich Christmassy green from my stash with a simple envelope closure, and a Kona Red binding frames it all nicely.

I picked this mini charm pack up over the summer when the line first came out, and it is my first experience with them.   There so cute and inexpensive, but I wasn't entirely sure what I wanted to do with it, especially since I just had one.  It helped make a perfect little brain break, though!  Back to the grind!


Wednesday, December 2, 2015

NTT and Winners!

Welcome back, and happy December, y'all!  I missed partying last week, but I had a wonderful Thanksgiving holiday in Louisiana with my family.  I hope all of you celebrating Turkey Day in the US had a wonderful time as well.  Now that Thanksgiving is over, it is officially the Christmas season- yay!  I love decorating my house, watching old Christmas movies, and singing along with the Christmas playlist on my iPod.  I still maintain that the Time Life Treasury of Christmas Set was one of the best gifts I ever received from the hubs (before SiriusXM, Pandora, and iTunes, of course).

Of course, that means that I am also swamped with some secret sewing projects for gifts that I can't share just yet.  One such project uses this gorgeous bundle, and I'm planning a fun, festive tutorial with it next week, so stay tuned-


Time to announce the Black Friday/Cyber Monday giveaway winners!  I selected the winners in the same order as they were listed in my sale/giveaway post.  First, the winners of a pdf pattern of choice from my shop are comment numbers 5 (Lissa) and 60 (Lee).


Next, the winner of the scrumptious V and Co Simply Colorful jelly roll (choice of three color ways) is comment number 11, Linda!


And last, but certainly not least, the winner of the Glisten Christmas FQ bundle from Fort Worth Fabric Studio is comment number 70, Janie!

Congratulations to all of you!  I will be emailing you soon so you can get your goodies!  :)


Okay, highlight time!  I can't tell you how much I love browsing through your projects each week, and having the honor of choose projects to feature, even if the choice is almost impossible sometimes! Life in the Dog House shared a couple of charity quilts in this cool pattern-


This Gravity quilt from Anja Quilts is absolutely stunning.  There are 114 Kona colors in this one- amazing!


And Soma from Whims and Fancies linked up this gorgeous rainbow star table runner (along with several other fantastic projects in the same post- check it out)!


I'm looking forward to checking out your projects this week.  Let's party!

1.  You can link finished projects or WIP's , but just keep it about quilting and sewing!
2. Link to your specific post (not to your home page!) to make it easier for others.
3. Please remember to spread the word and post my button or a text link.  
4. Spread the comment love far and wide!
5. Following me is not a requirement to link, but is so very appreciated!

*After some trouble with Linky Tools yesterday (on their part), the link is working, so party on, friends (and thank you for being patient).  :)


09 10 11 12
Blogging tips